Materials Required
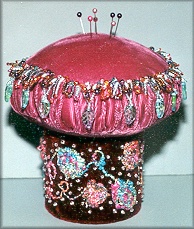
If you cannot locate the container, there are instructions below to make your own. (4 " x I I " rectangle for container, 2-3/4 " diameter circle for container bottom, two 5-1/2" diameter circles for Mushroom Top and Mushroom Top Underside, 2 " x 31 " rectangle for Mushroom Top Side) wool stuffing because they feel this helps to extend the life of their pins and needles.) Spread glue around top edge of container and about 1/4" inside the top of the container. Press edge of fabric around glued area. Glue the overlap of fabric on the container side. Spread glue around bottom edge of container. Wrap fabric over glue. Press in place. Glue small circle to bottom of container. When dry, hand sew on embellishments and beads to container sides. To embellish, I coiled colorful yarn into circles and hand sewed around the container. You could braid embroidery threads or silk ribbon to form the coils. I then sewed crystal beads (size 8 or 9) around container. Sew short ends of Mushroom Top Side together with a 1/4" seam. Next, machine gather a 1/4" seam along both long edges of Mushroom Top Side with two lines of stitching on each long edge. On the wrong side of fabric, mark into fourths with a pencil. Also mark into fourths the Mushroom Top and the Mushroom Top Underside. Gather the Mushroom Top Side and pin to Mushroom Top, matching pencil marks, and machine sew with a 1/4" seam. Repeat with Mushroom Top Underside. Cut a 2" slit in the middle of the Mushroom Top Underside. Turn right side out and stuff firmly (till it is rock-hard). Fill container halfway with rocks or marbles (if you had to make your own container, you should only fill about 1/4 with rocks as it won't be as strong) and then add fiberfill to fill up container. Hand sew Mushroom Top to top of container going around twice. Embellish top edge with bead fringes. I used different sizes of beads and different colors to match the yarn. I also added glass leaves.
Cardboard container: Out of thin cardboard, cut a rectangle 10-1/4" x 2-3/4" and a circle 3-1/2" in diameter. Draw a 1/4" seam on the outer edge of circle and snip lines all around the circle up to the line drawn. Glue rectangle together with a 1/2" overlap and so the container is 2-3/4" tall. Hold with clothespins till dry. Wrap overlap with tape to make it stronger. Fold up the clipped cardboard edges on circle. Place inside container to see if it is big enough. If it fits well, dab glue smoothly around inside bottom edge of container. Place bottom circle inside container with the snipped edges either facing in or facing outside the container. Hold with clothespins. Let dry. If container isn't real smooth (has a lot of creases) then cut out a piece of batting or fleece to place under fabric you cover the container with.
Please CLICK HERE to see cloth doll patterns from Sandy Miller.
Go to... Dollmaker's Journey A Doll Net Member Site by the Internet Visions Company. |
||